Operation KEG Part 5: Dum spero spiro!

fet_level_shift

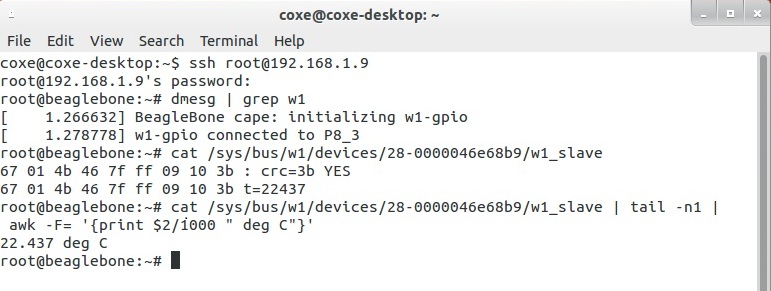
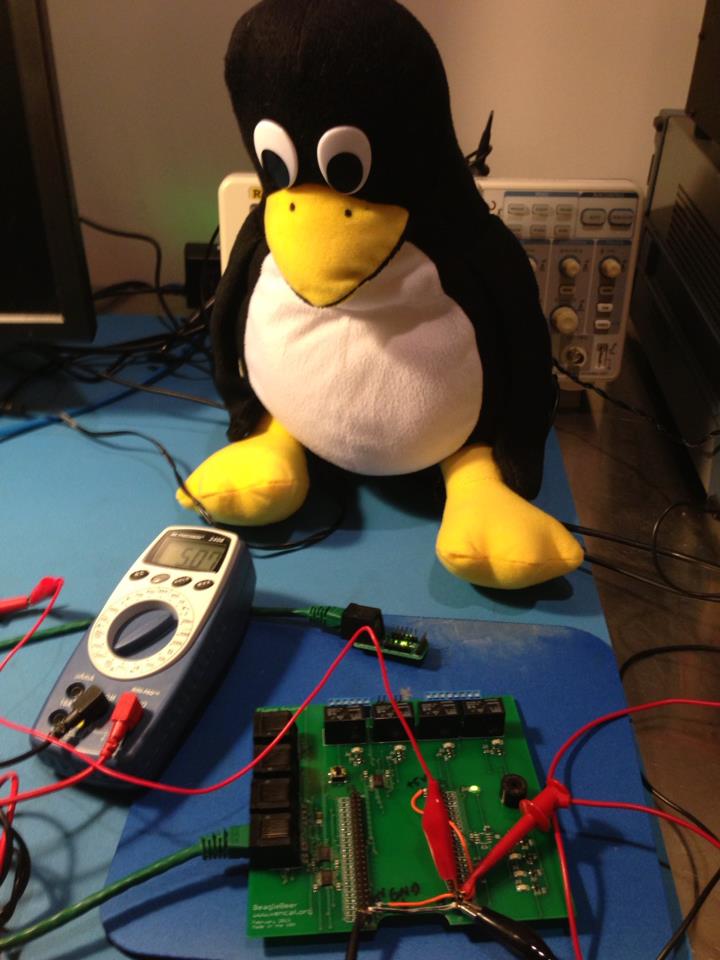
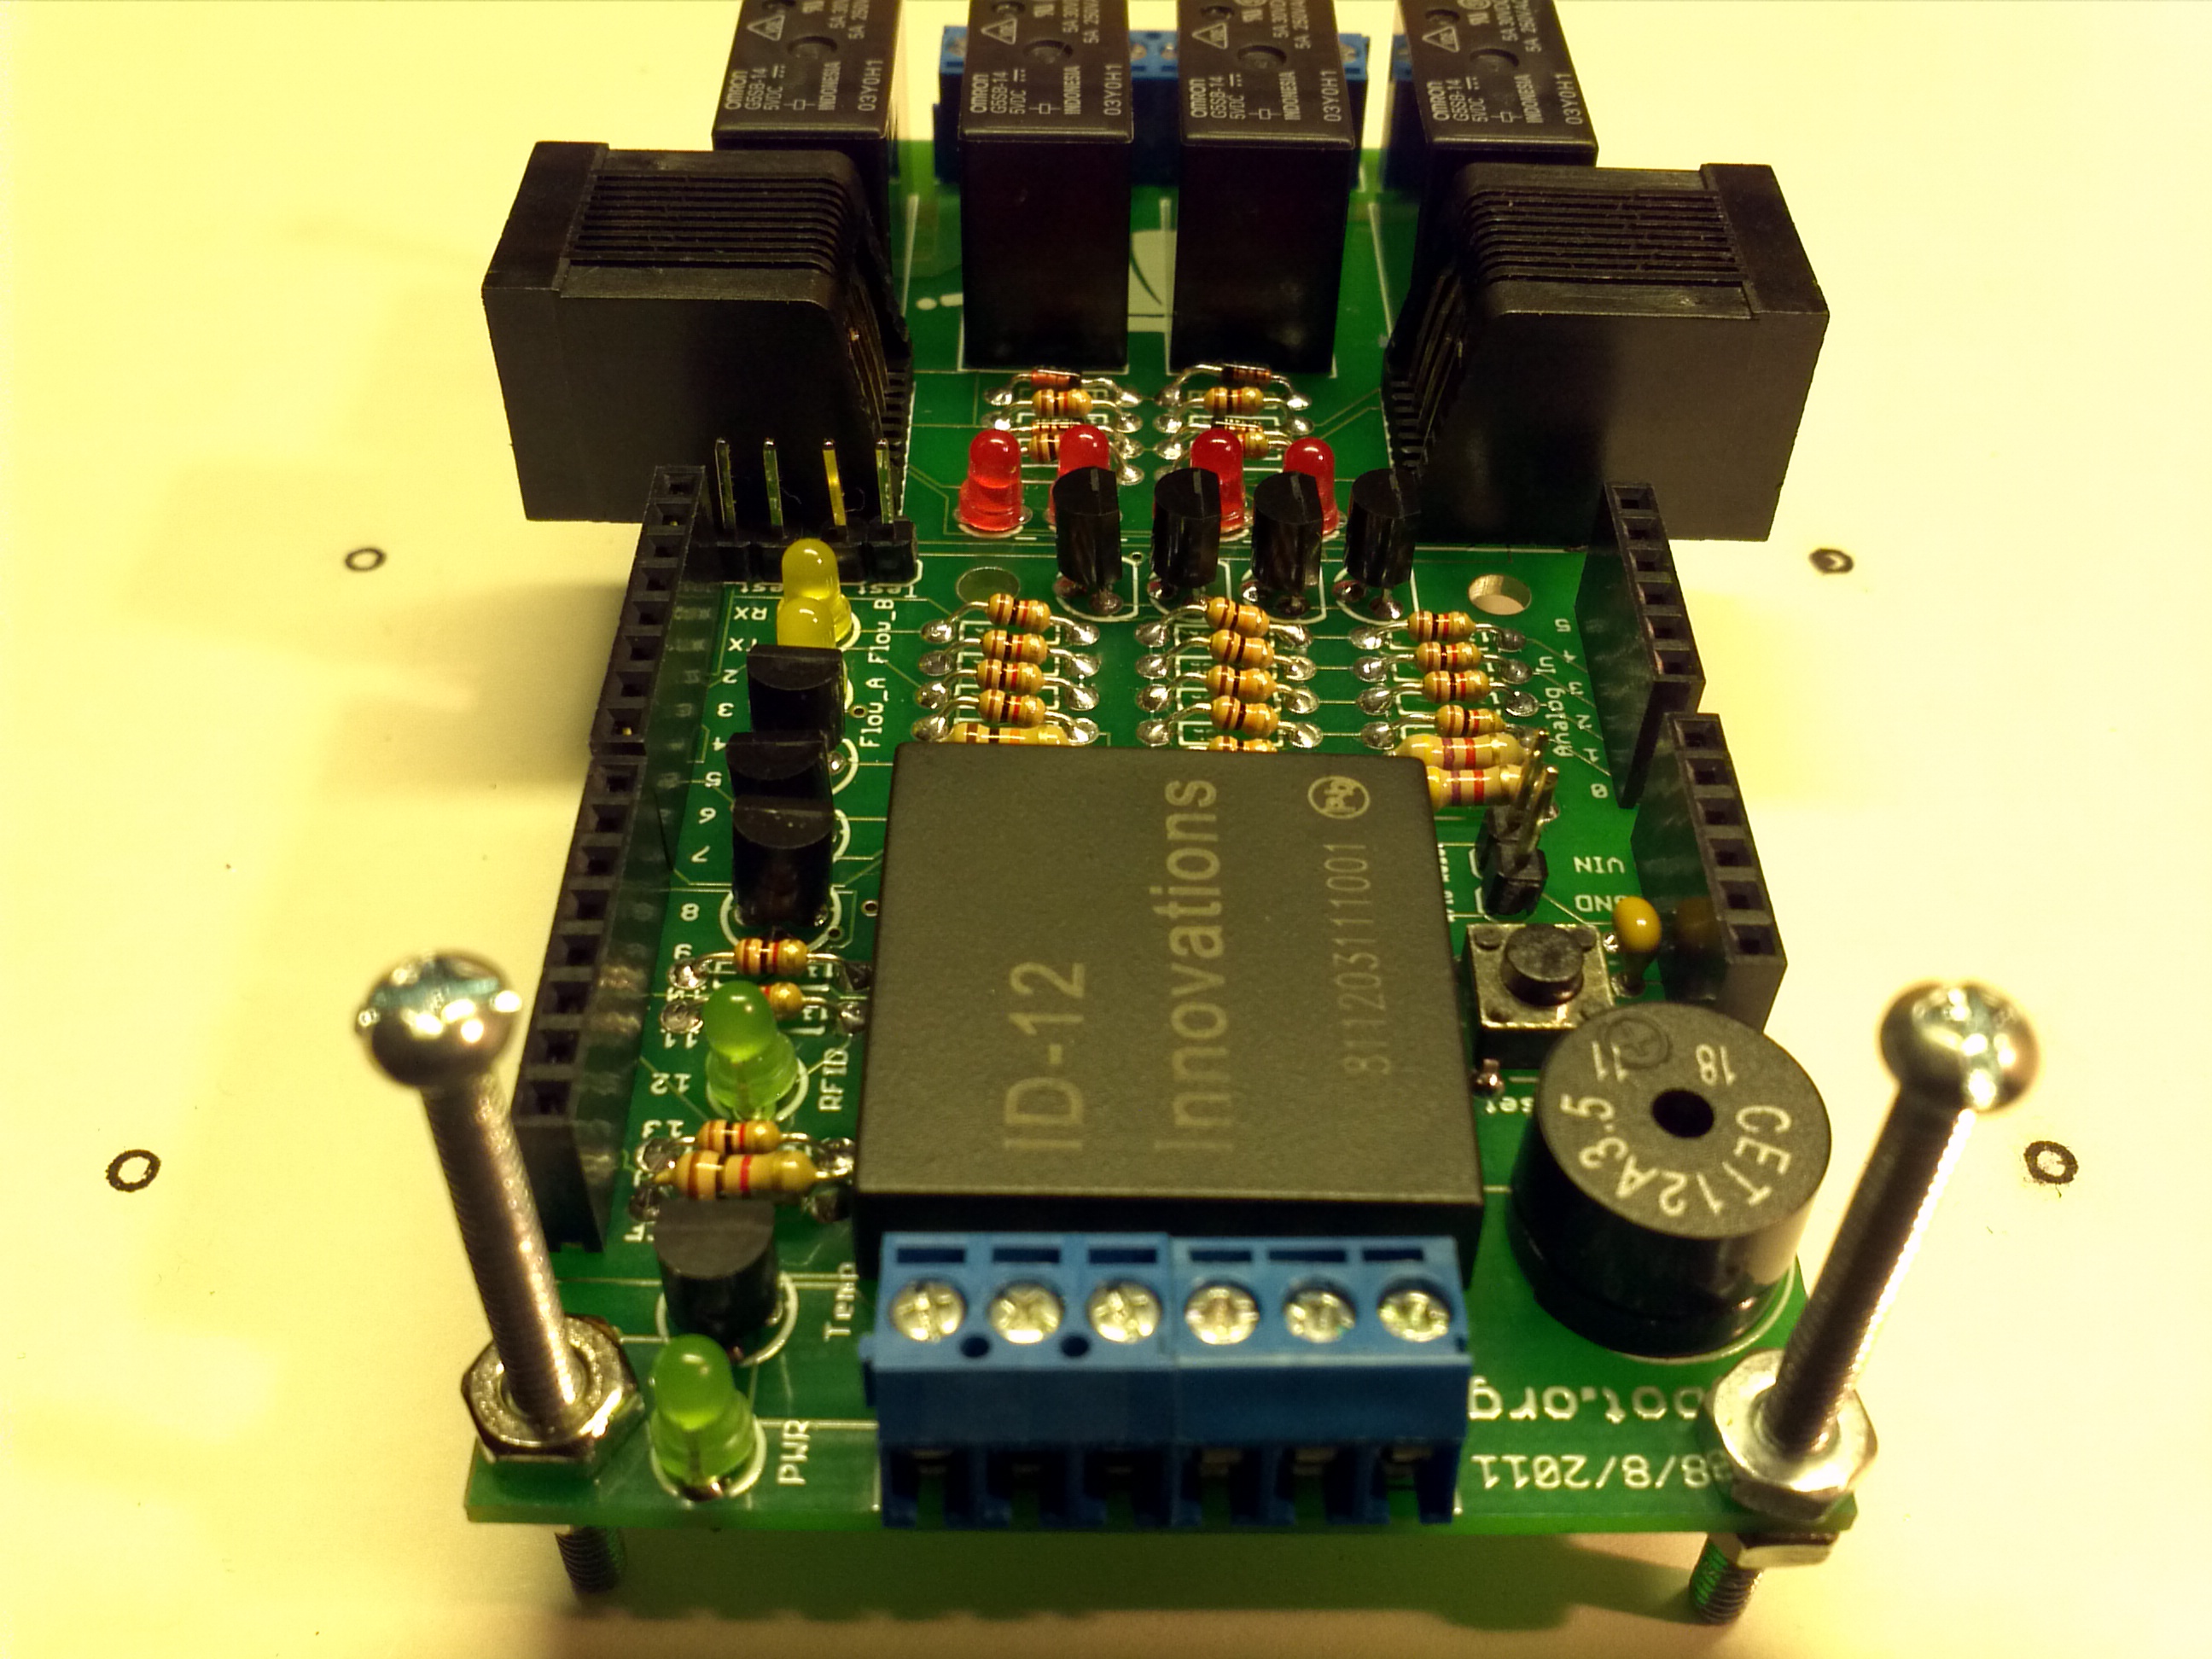
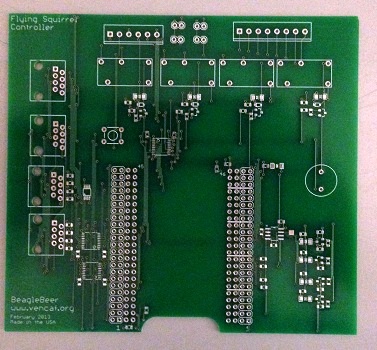
On Friday 5 April 2013 at 12:20 am, Tux the Polyester Penguin triumphantly declared: “Dum spero spiro!” after observing a string of valid temperature readings printed out in the debug console. Oddly, this Latin proclamation commonly attributed to Cicero happens to be the motto of the State of South Carolina. Although it translates literally to “while I breathe, I hope,” it makes more frequent appearances in modern English as “while there’s life, there’s hope.” As recounted in gory detail in Operation KEG Part 4: Houston, we have a problem, the BeagleBeer controller board, intended to play a pivotal role in the pimping of the Venture Café kegerator, had some design flaws. Tux and I burned the midnight oil in order to resurrect the temperature sensors, verify the proper operation of the beer flow sensors, and suss out the reason why the BeagleBone embedded computer fails to boot with the BeagleBeer board attached.

temp_sensors_3p3_readout

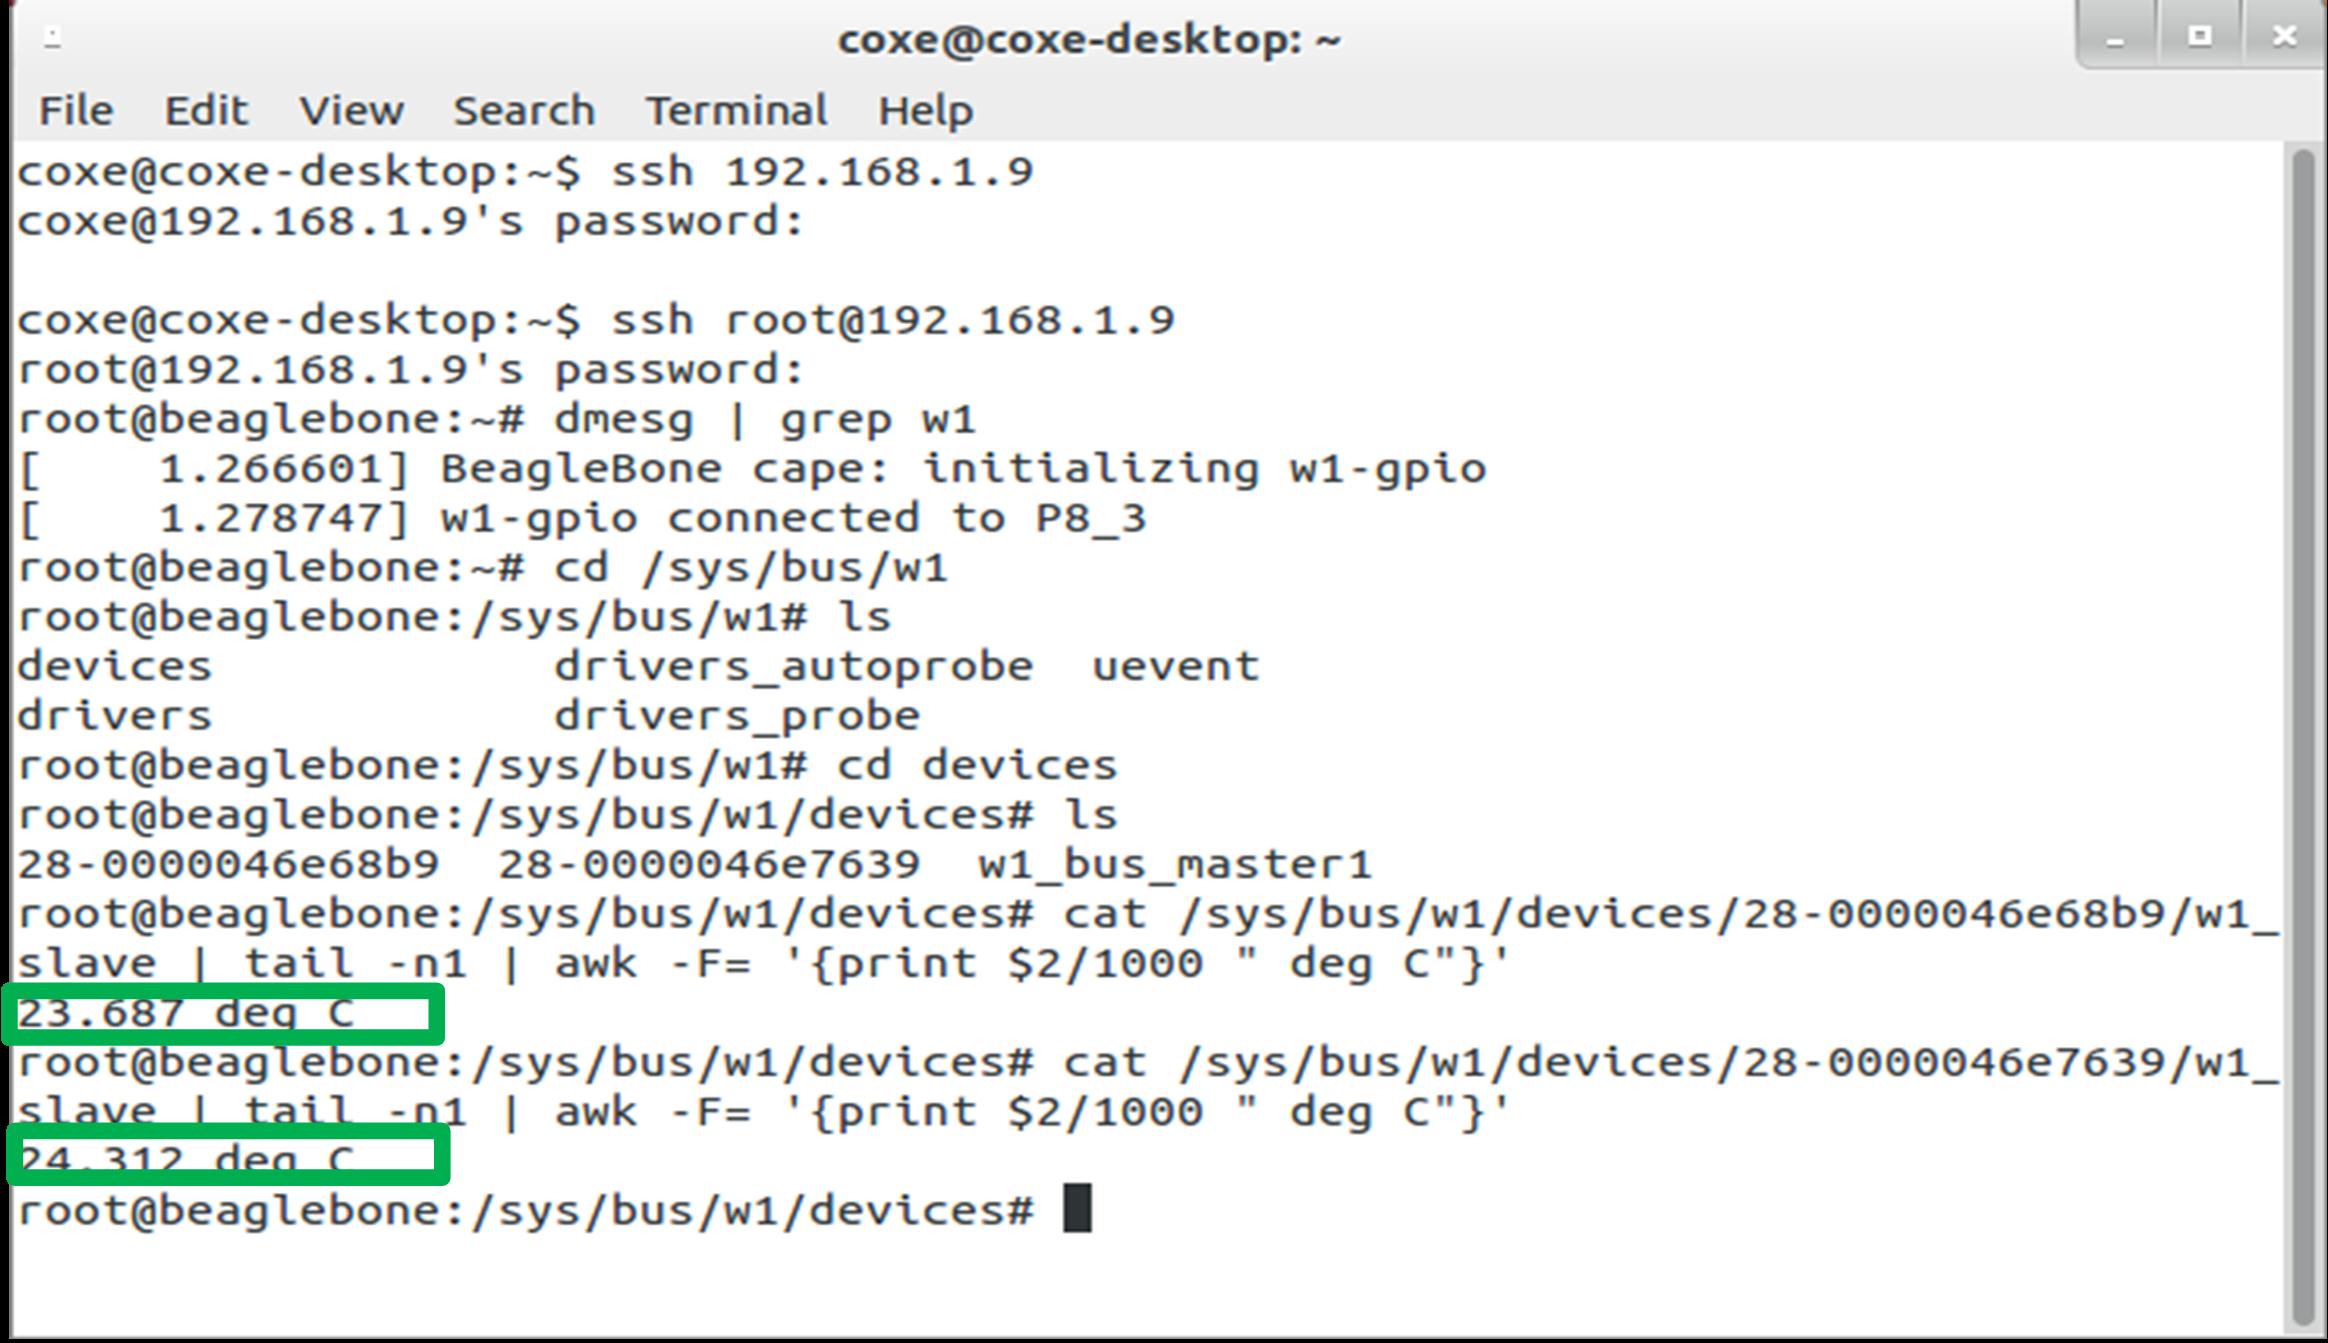
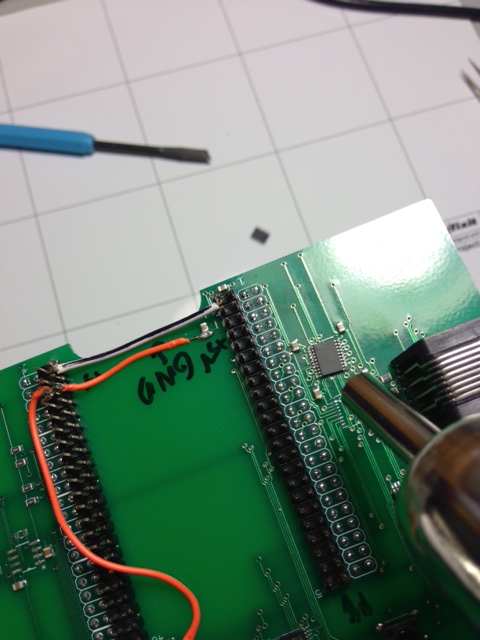
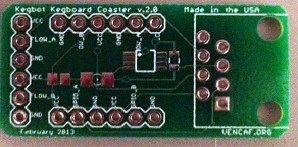
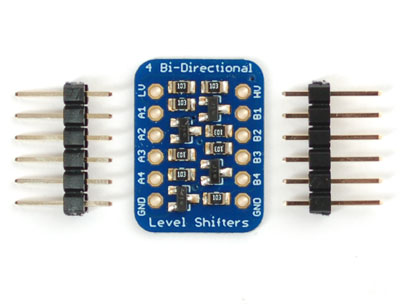
The Adafruit bi-directional level shifter, introduced at the end of the previous post, a tiny breakout board built from Fairchild Semiconductor BSS138 N-channel MOSFETs with 10K ohm pull-up resistors, enabled us to measure temperature on both the BeagleBeer and Coaster boards using the +3.3V BeagleBone one-wire interface.

ID757_MED

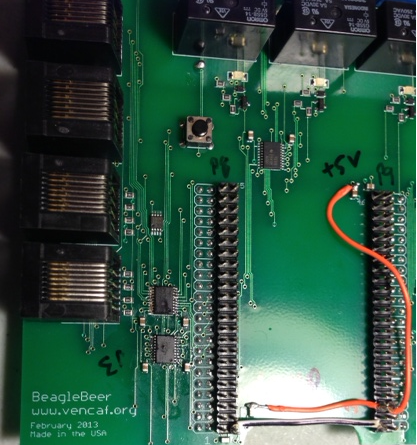
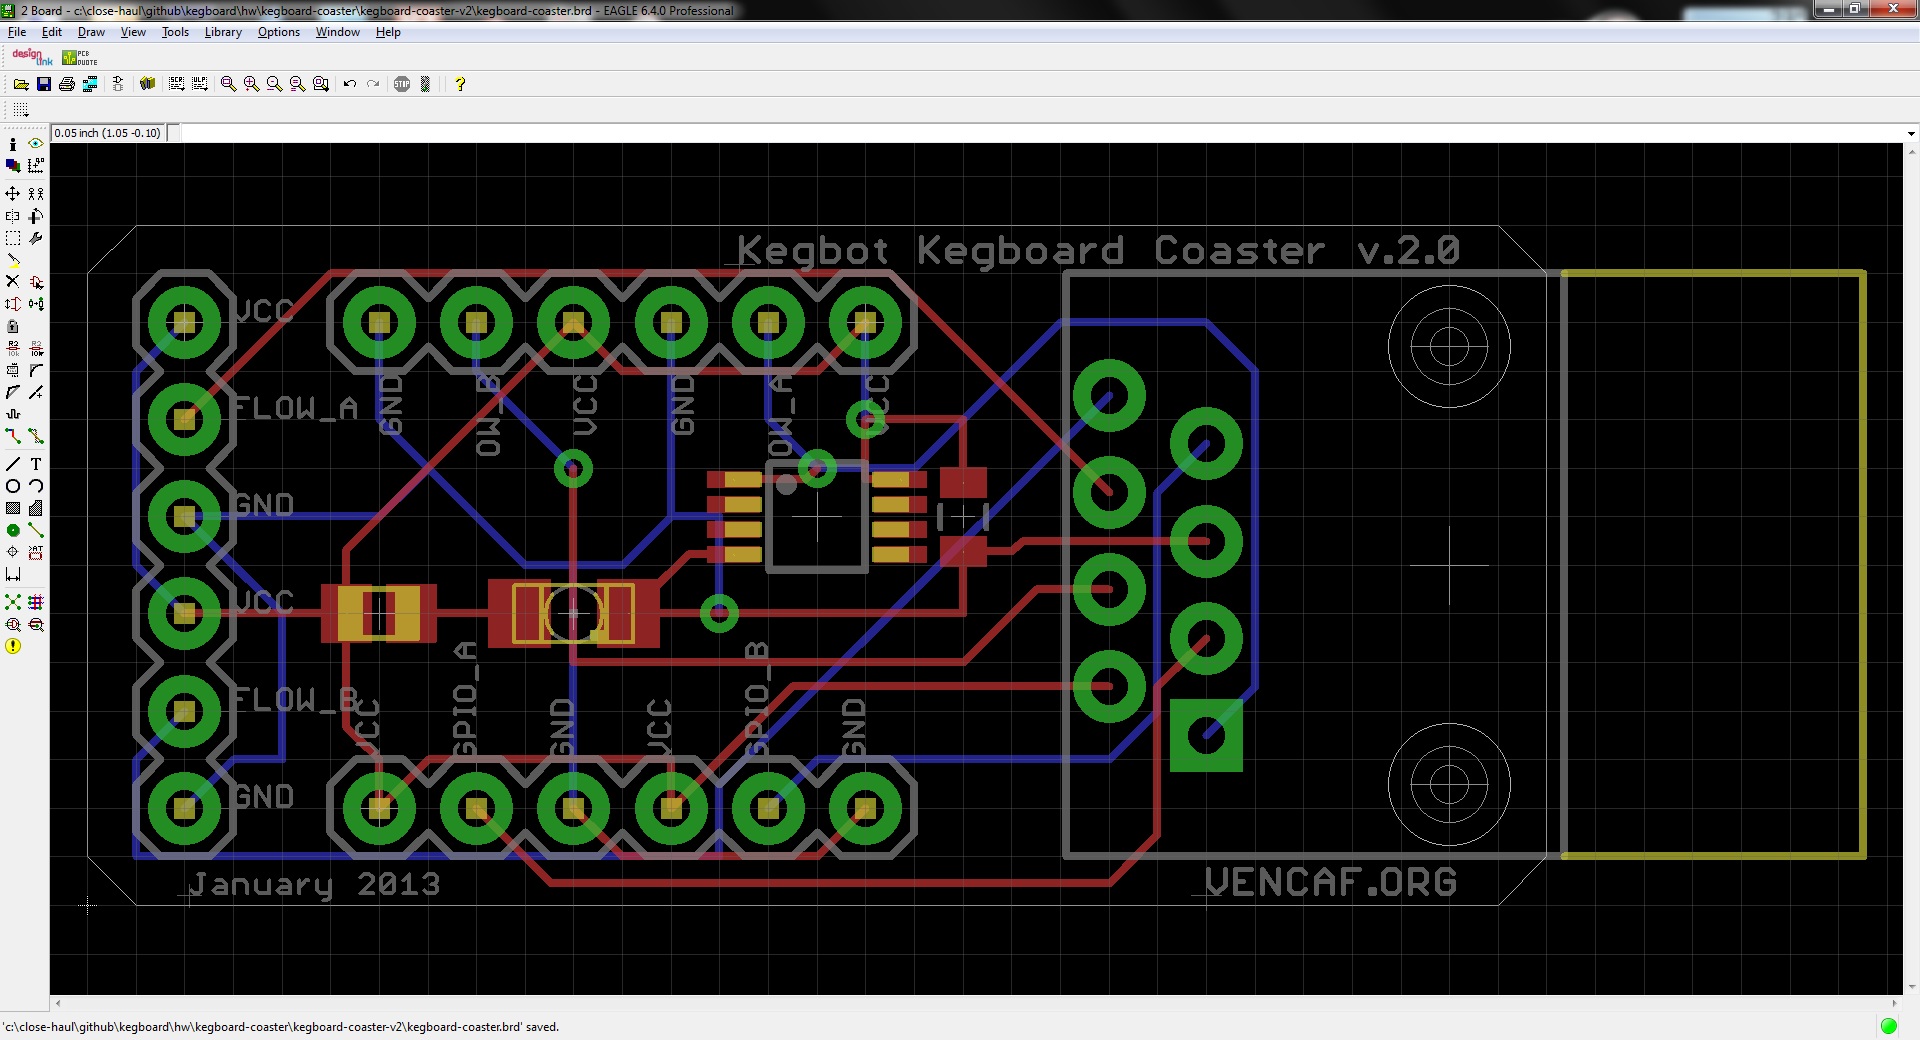
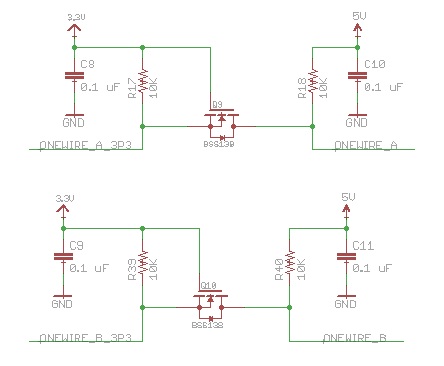
I discerned why this MOSFET approach succeeds in interfacing the +3.3V BeagleBone I/O line to the +5V one-wire data line on the temperature sensors without negative consequences by reading an application note from Philips Semiconductors. Arcane technical details aside, this retrofit works like a charm. As shown in the schematic snapshot below, I adopted a MOSFET level translation scheme for the one-wire sensors in BeagleBeer Version 2. All of the temperature sensors are connected in series to ONEWIRE_A. Although currently unused, the BeagleBeer also supports a second one-wire bus, ONEWIRE_B.

one_wire_lt

After learning of our success, Amy commented: “Wow, I don’t see any smoke or flames, or even any charring on Tux! Amazing.” Indeed.

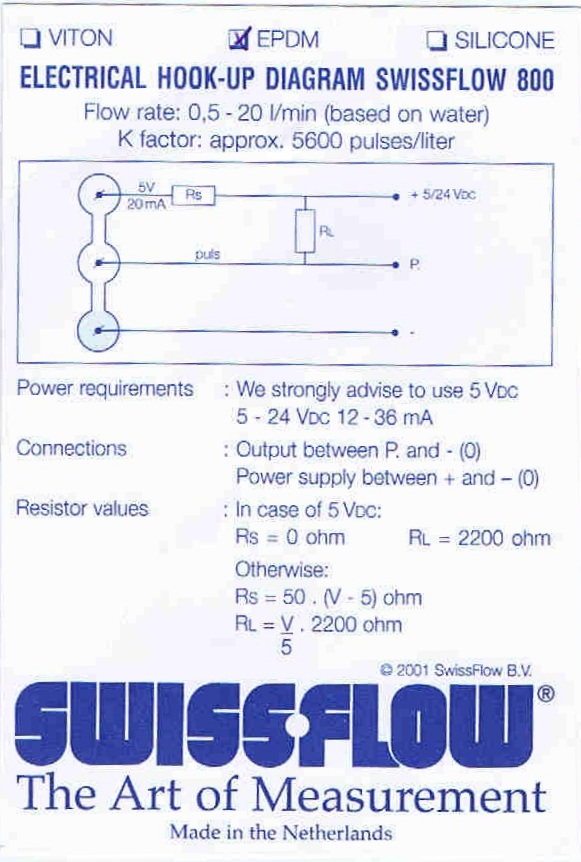
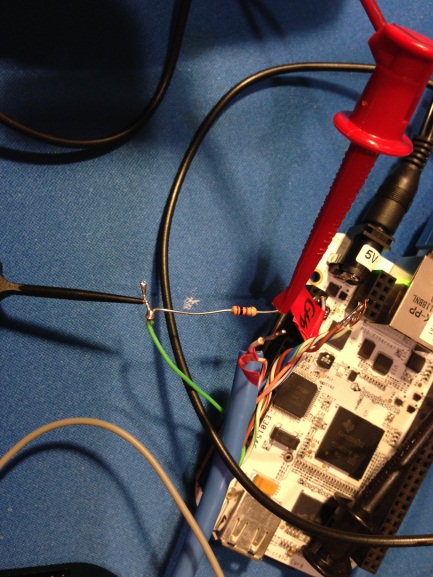
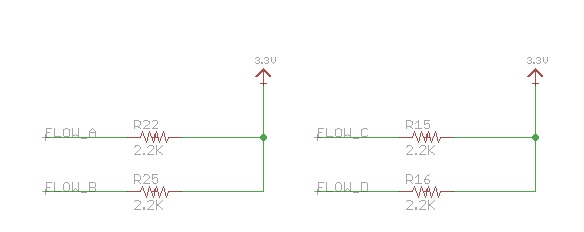
Not ones to rest on our laurels, we soon redirected our attention to the other key component controlled by the BeagleBeer, the flow sensors that measure dispensed beer volume. The Swissflow SF800 flow sensors have a 3-wire readout (+5-24 VDC power, ground, and data output line that requires a 2.2K ohm pullup resistor):

swissflow_setup

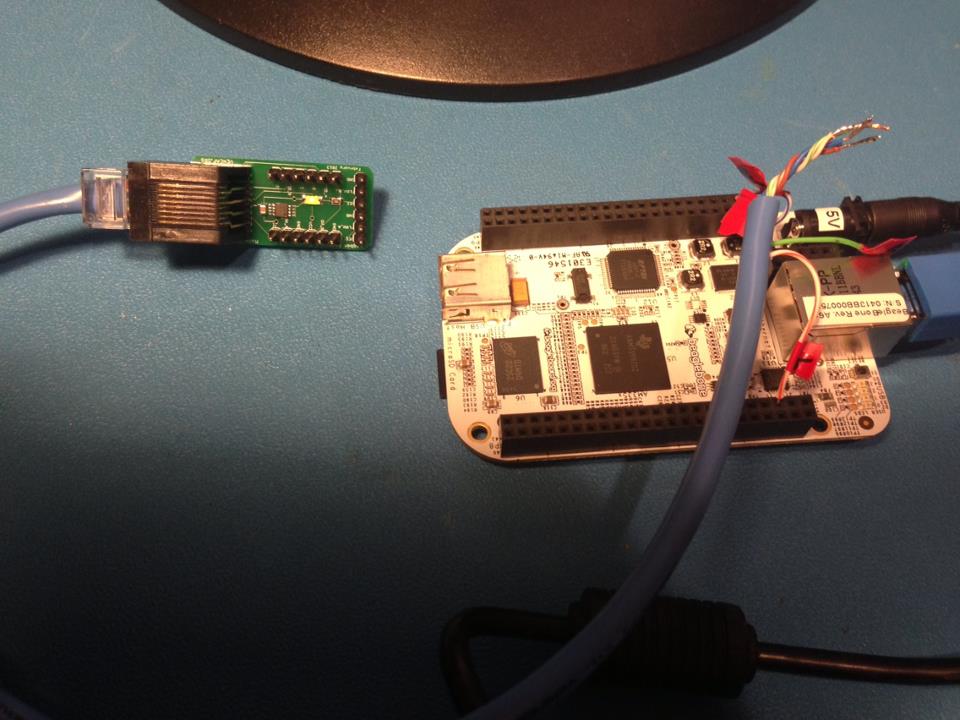
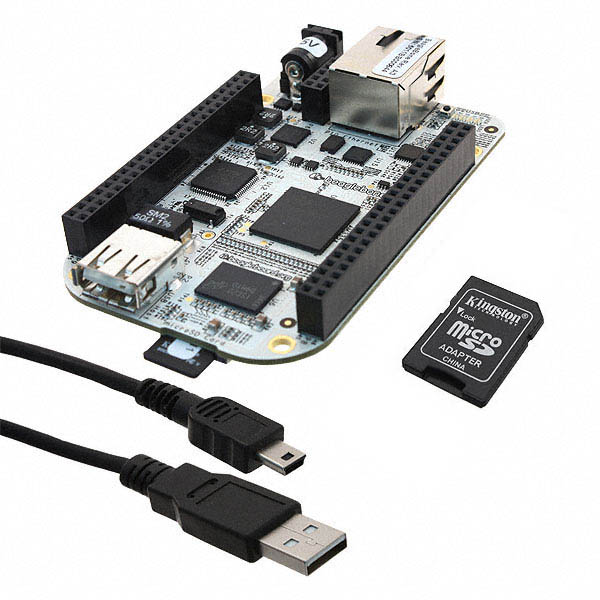
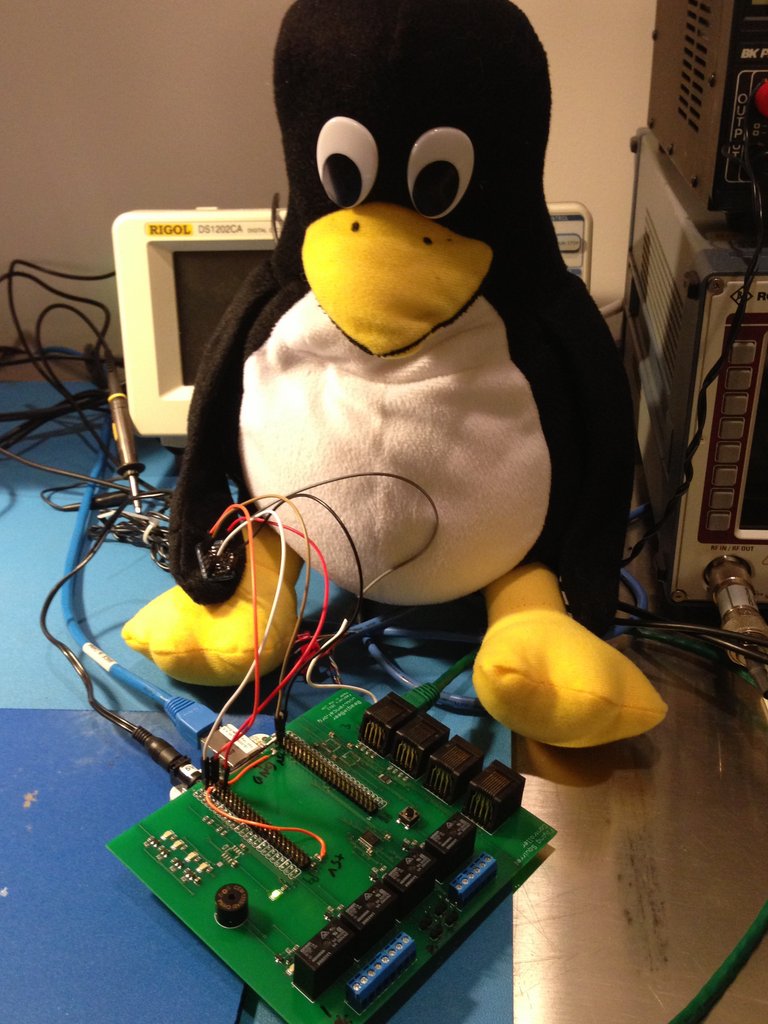
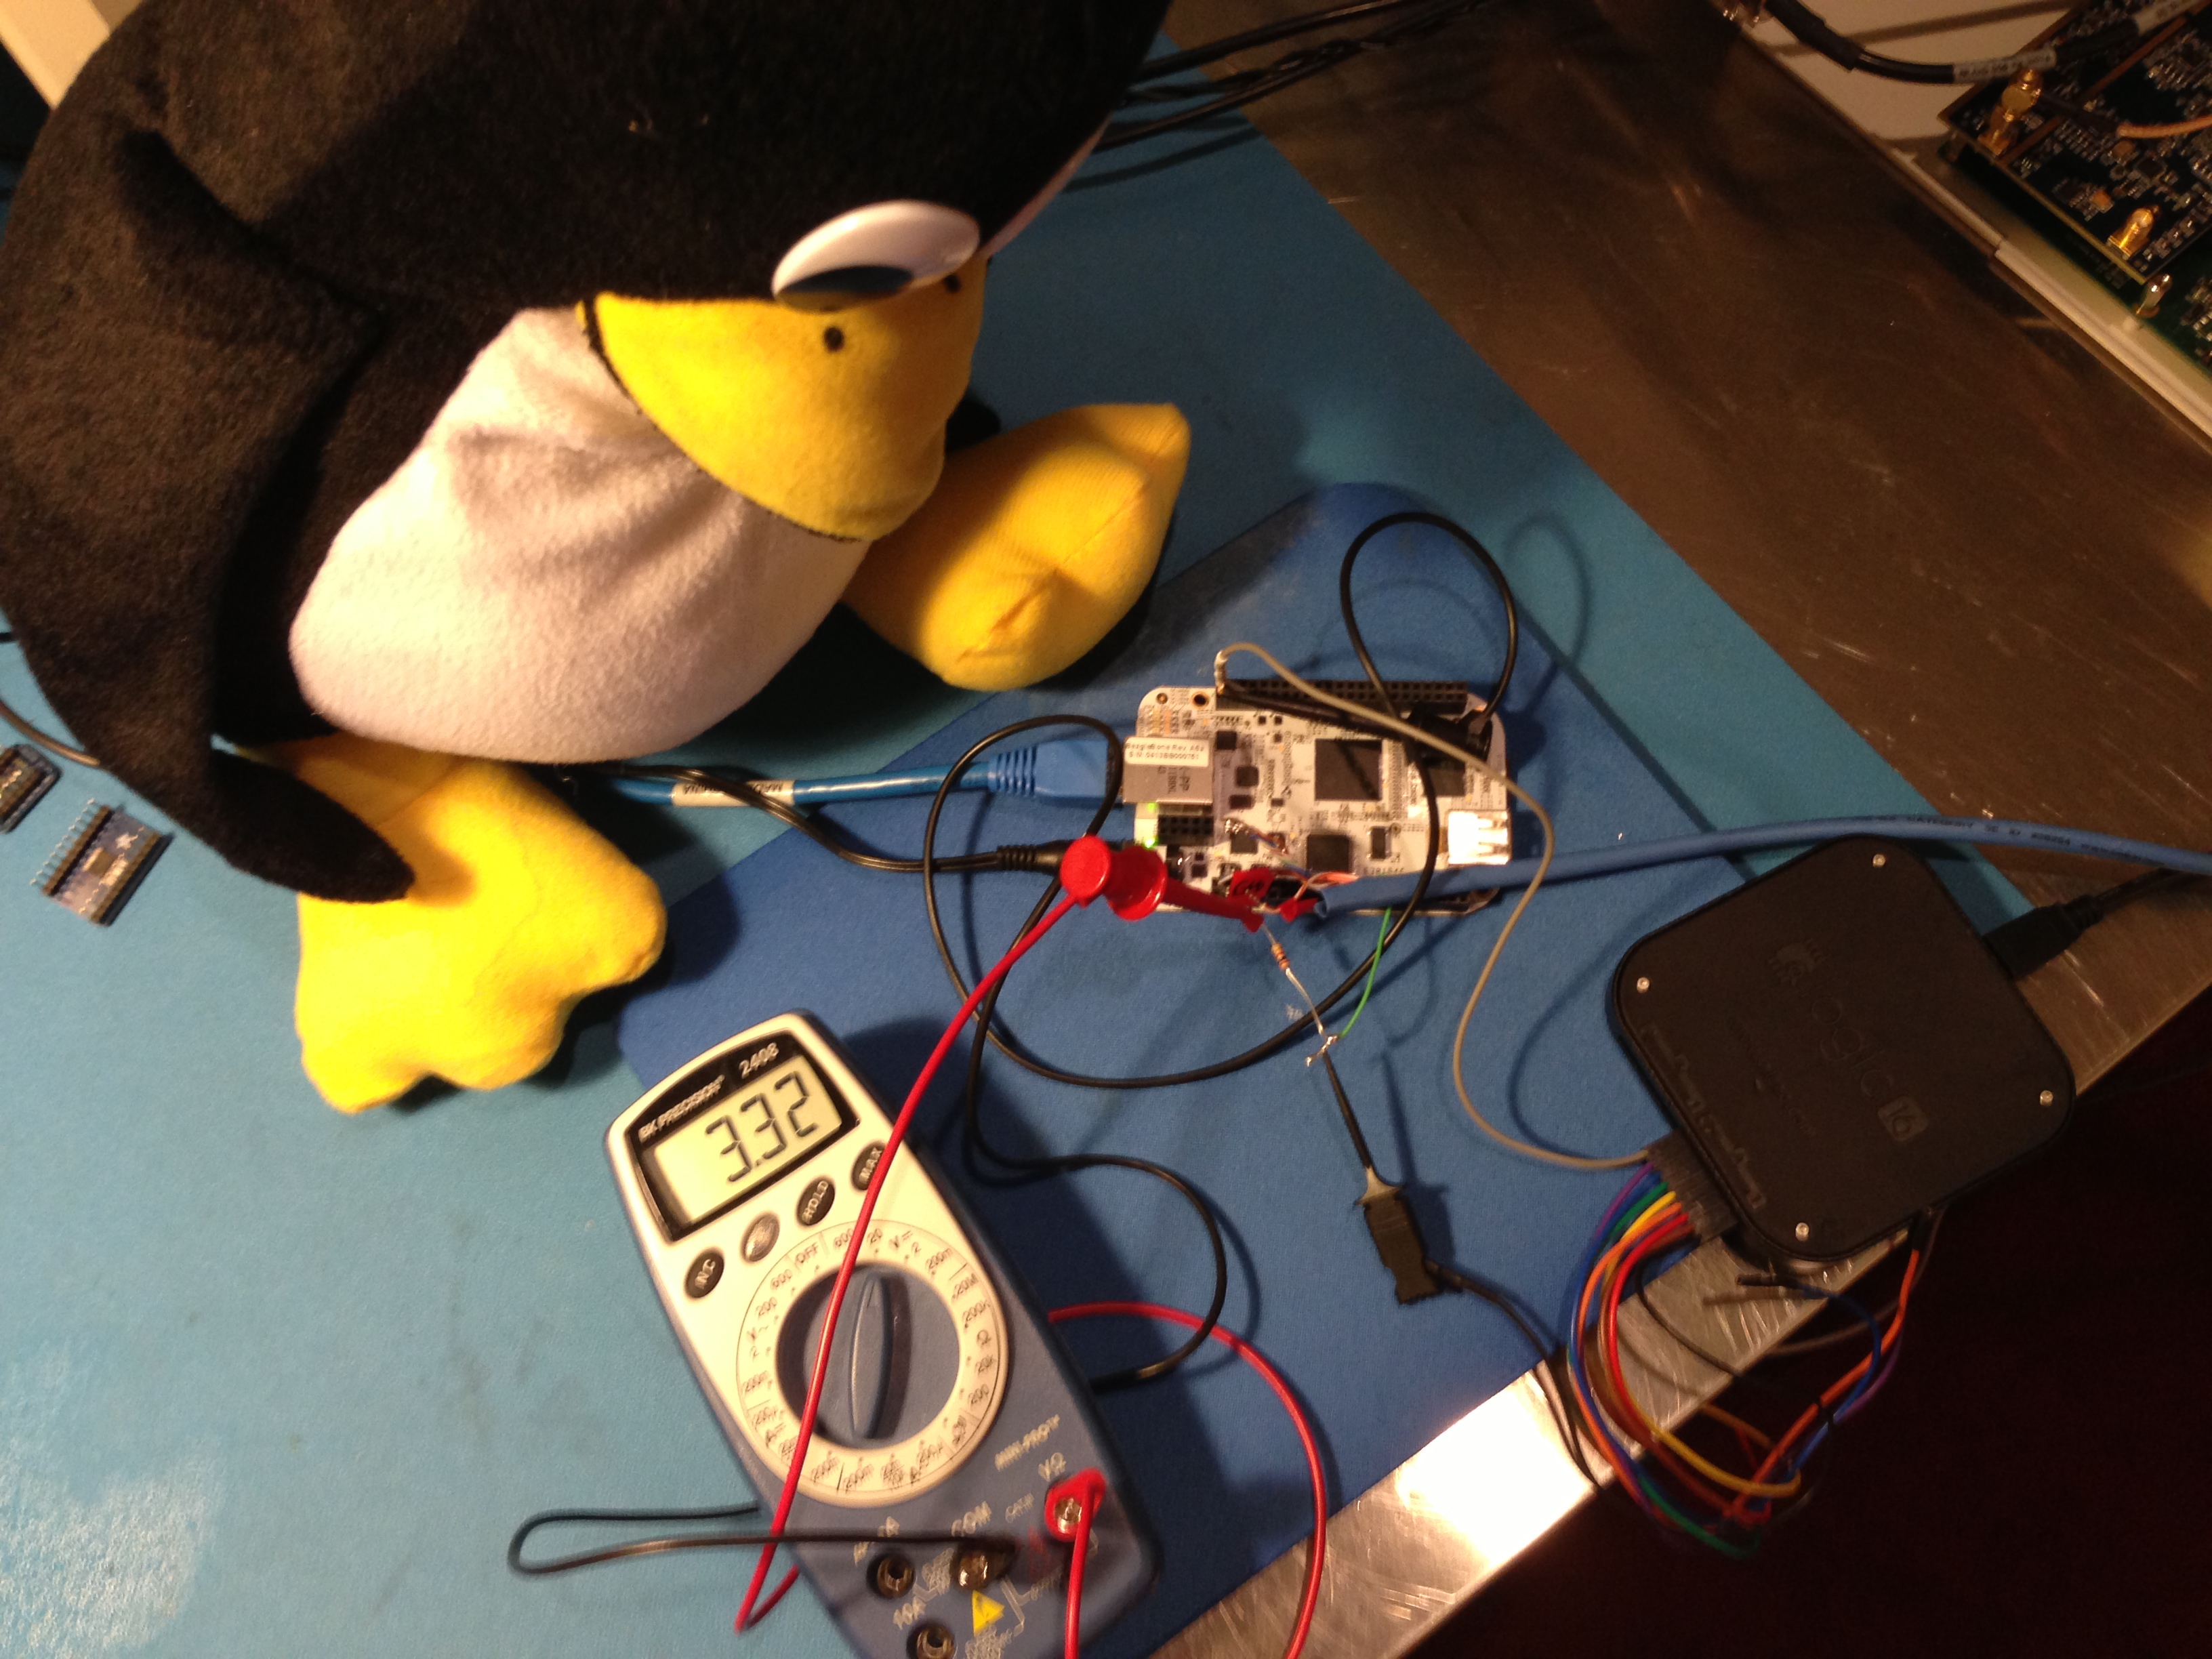
In the final configuration, the BeagleBone will count pulses on the flow sensor data line in order to compute volume, but our initial experiment involved simply verifying that the sensor in fact measured fluid flow. I hooked up the Coaster to the BeagleBone merely as a convenient platform for power and ground connections. I “borrowed” an old-school 2K ohm resistor from the lab at Analog Devices Lyric Labs that has long leads. The Cat5E Ethernet cable with the connector hacked off at one end again came in handy to interface the Kegbot Coaster and associated flow sensor to the BeagleBone and the Salae Logic 16 USB logic analyzer (the black box in the photo and a Christmas present from my brother). We made use of only one of the 16 available logic analyzer test lines to monitor to the output of the flow sensor. Tux inspects the data acquisition configuration:

pullup_flow_sensor_to_3p3Vold_school_resistor

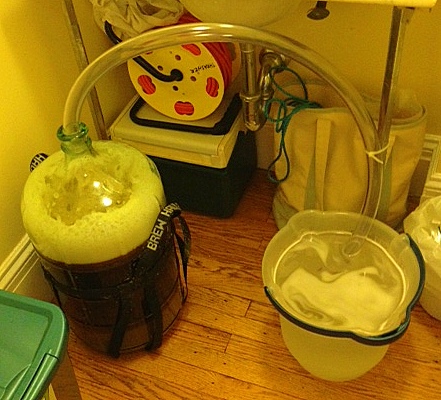
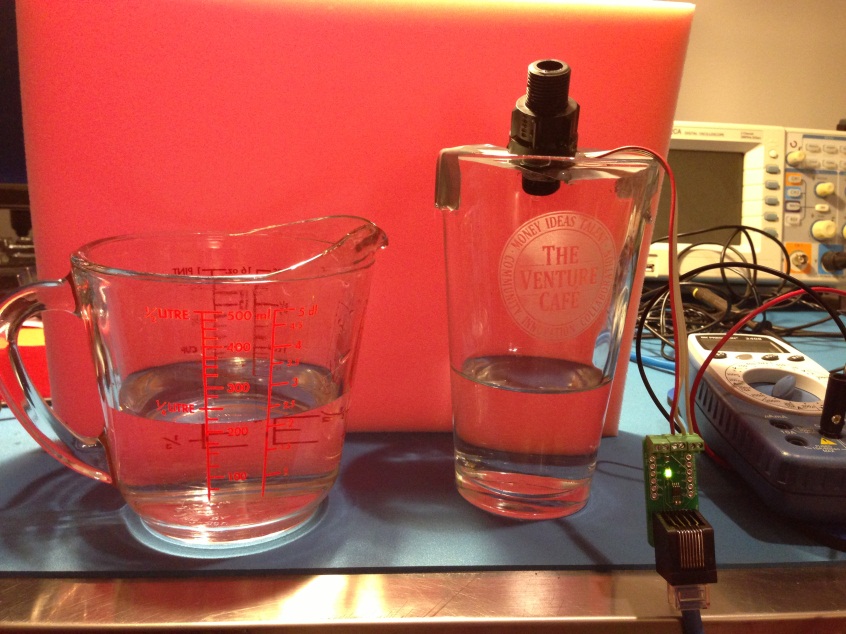
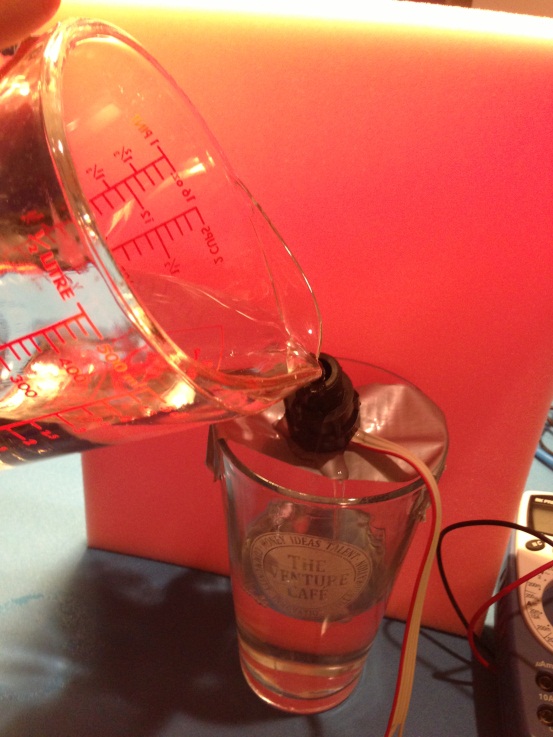
A stunning statement of the obvious– in order to measure fluid flow, we needed a mechanism to pour fluid through the flow sensor. Tapping into my inner MacGyver, I assembled a test setup using a measuring cup, water, duct tape, a Venture Café pint glass, and the flow sensor connected to a Kegbot Coaster board:

flow_test_setup

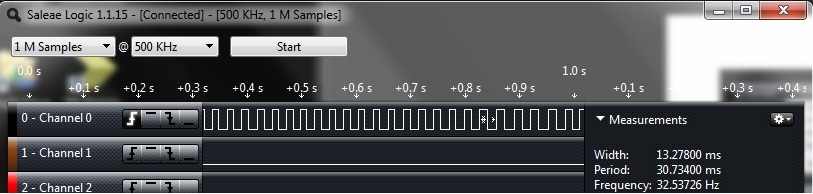
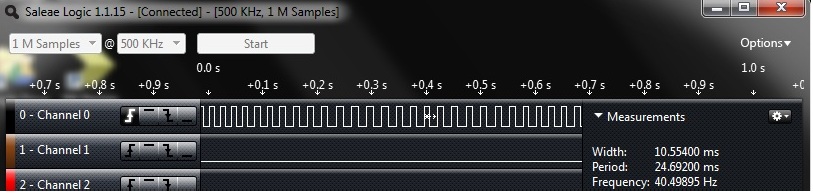
We conducted two experiments: 1) power the flow sensor at +5V and pull up the readout line to +5V, the manufacturer’s recommended configuration and 2) power the sensor at +5V and pull up the readout line to +3.3V, a BeagleBone-safe voltage level. [My homebrewing co-worker Sebastian Patulea suggested this simple, elegant readout scheme.]

After powering up the BeagleBone, it was time for the moment of truth…

flow_testing

Experiment #1 [+5V Logic Analyzer Output of Flow Sensor]:

flow_sensor_output_5V

Experiment #2 [+3.3V Logic Analyzer Output of Flow Sensor]:

flow_sensor_output_3p3V

Success! We proved that we can power the SF800 Flow Sensor at +5VDC and pull-up the flow sensor output with a 2.2K ohm resistor to either +5VDC or +3.3VDC. The +3.3V configuration obviates the need for more complicated level shifting schemes, a change that I immediately propagated to the BeagleBeer Version 2 schematic:

flow_sensor_pullup

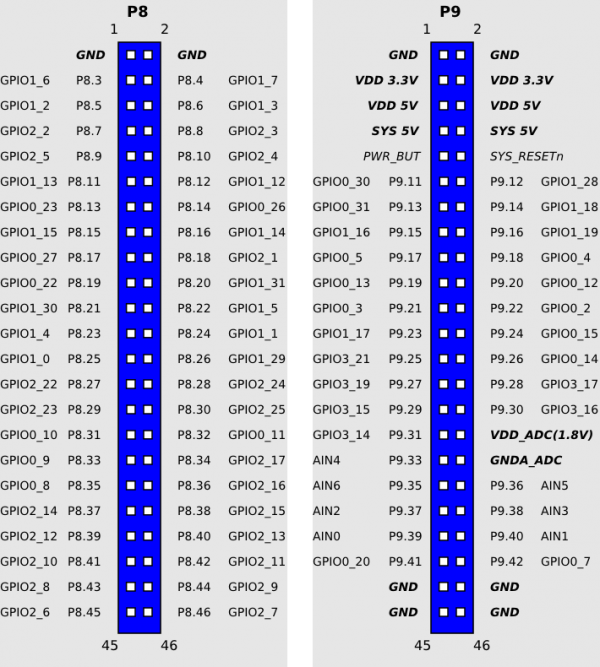
Before sending out the BeagleBeer Version 2 printed circuit board design for fabrication, we had to resolve one outstanding glitch. As mentioned in Operation Keg Part 4, the BeagleBone computer fails to boot when mated with a BeagleBeer board. Consequently, I had to power on the BeagleBone and then hot-plug the BeagleBeer. Although I repeated this step several times without incident, it is not a workable solution in the long term. As it turns out, had I RTFM (Read the F***ing Manual) at the outset, this problem could have been prevented. Behold page 72:

bb_boot_config

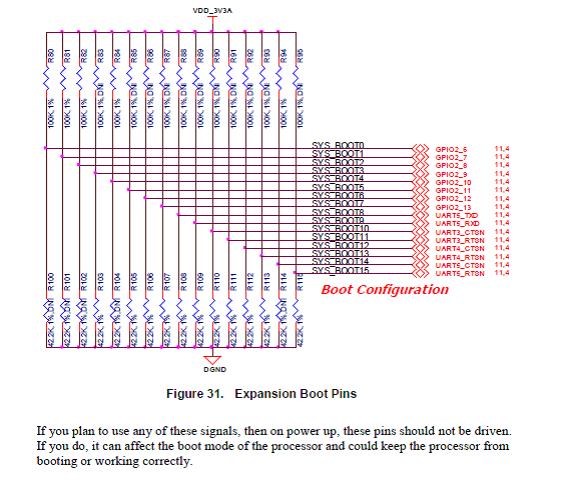
Leaving these 16 system boot I/O lines unconnected at power up should resolve the problem. In the BeagleBeer Version 1 schematic, pin UART5_RXD is mysteriously connected to ground, and pins GPIO2_11 and GPIO2_13 are connected to flow sensor status LEDs. In Revision 2, I assigned these signals to other pins on the BeagleBone header connectors.

I’ve completed the modifications to the schematic and layout (available on Github) and am on the verge of placing the order for BeagleBeer Controller Version 2 printed circuit boards from Sunstone Circuits. Sebastian has kindly offered to assemble the new BeagleBeer, sparing it the indignity of my mediocre soldering skills and saving the Venture Café Foundation several hundred dollars in outsourced manufacturing costs. Next, I intend to write some code for the BeagleBone to count pulses output by the sensor using GPIO interrupts. One liter of beer corresponds to 5600 pulses. A packetizer function will bundle these pulse per unit time readings with temperature measurements and periodically send the data to the Kegbot Android app over a UART to USB interface. Tux has decreed that we will perform our first live test with beer at Venture Café on or before Thursday 2 May 2013. Watch this space for updates!

The delicious sting of collaboration

This week, our retailer Downtown Wine and Spirits hooked us up with an amazing beer that reflects the spirit of exchange and collaboration so revered by our entrepreneurial community. The beer is called Stingo Collaboration No. 3, and it is brewed by Cambridge’s own Pretty Things in close collaboration with Boulevard Brewing Co. of Kansas City, MO.

The two are an odd match: Pretty Things employs four people and tenant brews on a 50-barrel system, while Boulevard is one of the largest craft beermakers in the US, boasting a state-of-the-art 150-barrel brewery, and employing over one hundred people. The brewers met at the American Craft Beer Fest in June 2011. During the Belgian Beer Festival in Fall 2011, Boulevard brewmaster Steven Pauwels suggested a collaboration between the breweries as they imbibed at Lord Hobo in Cambridge. Pretty Things’ Martha Holley-Paquette, a native of Yorkshire, offered the idea of the historical sour English ale (or is it the original Flanders Red?). The collaboration would push the envelope for both breweries: Pretty Things had never done a collaboration beer before, and Pauwels, a native Belgian, had not brewed an English-style beer, or considered English ingredients, since arriving at Boulevard over 10 years ago.

Together, over a series of emails, Pretty Things and Boulevard developed a recipe that combined English beer ingredients and brewing history with current Belgian beer brewing styles. The recipe called for 100% Yorkshire malts, a Yorkshire ale yeast, and a few different English hop varieties. Pauwels remarked that his brewery once threw out some of these hops due their extremely odd aroma.

In April 2012, the Pretty Things brewers traveled to Kansas City to brew Stingo: “We milled in, blended the preliminary batches, tweaked the ageing and ingredients, and most importantly ate more barbecue than any four people should ever eat.” Since Boulevard at the time did not work with foeders – very large wooden tuns used in Belgian brewing – the team created the beer’s “sting” with bacterial fermentation in the brewhouse, adding dry ice to the brew kettle to lower the temperature, thus encouraging bacteria to flourish, producing the “souring” lactic acid. Over the next few months, the brewers experimented from afar with different blends of Stingo batches to arrive at the final product.

Stingo tastes like a dry, brown ale, with a subtle sour “sting” upon sipping, followed by a dry and balanced finish. Pauwels describes Boulevard’s Collaboration No. 3 as “bold and full-bodied, with a big malty nose, hints of dark malt, chocolate, licorice, and black fruits, and just the right amount of tartness in the finish. It pairs exceptionally well with wild game, smoked meats, strong cheeses, and heavily seasoned dishes.”

Allow these brewers to entice you to venture beyond your own venture, and visit the Café this Thursday for a taste of collaboration.

Operation KEG Part 4: Houston, we have a problem

Debugging electronics requires resilience in the face of calamity. But unlike brain surgery, the consequences of errors are not paralysis or death, merely time, money, and small emissions of noxious fumes from melting solder and burning plastic. Upon recognition of a mistake that seems patently obvious in the harsh light of 20/20 hindsight, the designer finds herself holding her head in her hands, shaking her fist, and uttering strings of obscenities (abbreviated henceforth as “doh!”). In this post, I shall attempt to recast abject failure as an educational experience (not to mention a source of amusement for the beer blog reading public).

Before launching into a tragic tale of woe, let’s rewind. During the blizzard on Friday 8 March, I made the questionable decision to drive up to Proxy Manufacturing in Methuen to retrieve the assembled Kegboat Coaster and the BeagleBeer controller boards, first introduced in Operation KEG Part 3. Eager to accelerate the pace of kegerator innovation, I discovered in short order that the Kegbot Coaster boards work perfectly. Each Coaster board has a Maxim DS18B20 one-wire temperature sensor, a green LED, an RJ-45 connector to transfer power and data to the BeagleBeer interface controller, and 3 rows of header connectors. In addition to the on-board temperature sensor attached to One-Wire A, the Coaster serves as a connection point for 2 flow sensors, two miscellaneous GPIO lines, and a second one-wire device. (The four tap kegerator at Venture Café will require two Coaster boards.) For initial tests, I hacked off the connector on one end of a Cat5E Ethernet cable in order to expose the +5V, ground, Flow Sensor A, and One-Wire A wires.

kegbot_coaster_test

The rows of black header connectors along the long edges of the BeagleBone single-board computer include +5 and +3.3 V DC power rails, ground connections, and input/output interfaces to the ARM Cortex-A8 microprocessor. After connecting the ground and power lines of the Cat5E cable to BeagleBone connector P9 pins 1 and 3, respectively, the BeagleBone sources +3.3 VDC power to the Coaster. The one-wire temperature sensor was plugged into connector P8 pin 3 (GPIO1_6), designated ONE_WIRE_A on the BeagleBeer schematic.

beaglebone_headers

The BeagleBone ships with the Angstrom Distribution of Linux pre-installed. Although the BeagleBone has a myriad of on-board peripherals, it only sports 66 input/output pins. Pin functions can be assigned by software at run time. The supported configurations are documented in exhaustive detail in the BeagleBone Reference manual. A one-wire Linux driver, w1-gpio, is associated with connector P8 pin 6 (GPIO1_3) at power-up. Convincing the BeagleBone to treat P8 pin 3 as a one-wire I/O line required a Linux kernel patch, a diversion that I will not discuss in detail except to say that it was thoroughly dorktastic. After rebuilding the patched kernel and connecting the one-wire line from the Coaster to P8 pin 3, the green LED illuminated (hallelujah!). Eventually, a C, Python, or Javascript program will periodically poll the sensor and output a temperature. However, reading the temperature directly from the w1-gpio driver also did the trick (ignore the bizarre command line syntax):

temp_sensor

The DS18B20 temperature sensor can operate at either +3.3 or +5V. In the original Kegbot project, the Coaster board was designed for +5V, the minimum operating voltage for the Swissflow SF800 flow sensors. Furthermore, the Arduino microcontroller used in most Kegbots has +5V-compliant I/O lines. Unfortunately, applying +5V to a BeagleBone +3.3V input pin will fry the board. As we shall see, this seemingly minor detail complicates things quite a bit.

Satisfied with the Coasters, I plugged the BeagleBeer board into the BeagleBone and flipped on a +5V lab supply powering the two boards. Suffice it to say that things did not go according to plan.
The board failed the dreaded Smoke Test. As soon as I turned on the power, I smelled something burning. I immediately switched off the power supply and inspected the board, only to discover that the EEPROM had heated up so much that it had melted all of the solder joints and detached itself from the BeagleBeer printed circuit board. Doh!

The EEPROM stores the name and ID code of the BeagleBeer board in non-volatile memory (values persist in the absence of power) and can be programmed and read back by the BeagleBone. For all practical purposes, removing the EEPROM should not affect the other functions of the BeagleBeer board. The cause of this unfortunate occurrence did not take long to track down—reversed power and ground pins on the schematic symbol.

oops
Temporary fix: remove the EEPROM.

Power on Take 2! No more smoke, thank the gods in these unforgiving times. After a quick temperature check of all of the major components on the board with the tip of my index finger, I measured the voltages on all of the power rails on the BeagleBeer board with a multimeter. The +3.3V connections passed with flying colors. The VDD_5V and SYS_5V lines, connected to BeagleBone connector P9 pins 5, 6, 7, and 8, registered 5.0 V as expected. But all of the +5V lines on the rest of the board appeared to be at 0 V. Doh!

I verified that the 5V power lines and GND were, in fact, not shorted together using the handy continuity test mode on the multimeter. The instrument emits a loud beeping noise when the two test probes are connected.

contuinity-test-multimeter

After poring through the BeagleBeer circuit schematic, I failed to identify any obvious knuckleheaded mistakes. A quick glance at the board layout in the Eagle CAD tool, however, revealed the awful truth– nets called 5V (the BeagleBone power pins) and 5.0V (the 5V power rails everywhere else) were, tragically, not connected to each other. Out came the soldering iron for a minor surgical procedure that involved connecting two orange wires from the BeagleBone 5V power pin to the 5.0V nets. I added another GND connection between the two BeagleBone connectors for good measure. Tux the Polyester Penguin inspects the result:

soldering_irontux_beaglebeer_1

Power woes behind us, Tux and I decided to attempt to read out the temperature sensor on the Coaster through the BeagleBeer controller. Using a Cat5E cable with both ends intact, I plugged the Coaster in to the RJ-45 receptacle on the BeagleBeer. For some as yet to be determined reason, the BeagleBone does not boot when powered on with the BeagleBeer board connected. So, after Linux had booted, the BeagleBeer board was hot-swapped onto the BeagleBone, which, admittedly, was probably not most sensible thing to do.

The power LED on the BeagleBeer illuminated and all seemed well until I attempted to read out the temperature sensor. Linux acted as if no one-wire slave devices were present. I double-checked that the sensor worked standalone. After some head scratching and consultation of data sheets, I zeroed in on the Texas Instruments TXB0108 level translator chips. Because the BeagleBone can only handle digital inputs and outputs up to +3.3V, the +5V inputs from the Coaster board must have the high voltage (corresponding to a binary ‘1’) stepped down to avoid frying the ARM core. To make a long story short, this particular level translator chip will not work for open drain applications like one-wire temperature sensors. Doh!

Texas Instruments helpfully suggests replacing the offending TXB0108s with pin-compatible TXS0108s, which include internal pull-up resistors and will play nicely with one-wire devices. The new chips arrived from Digikey within 48 hours. Replacing surface-mount integrated circuits, however, is more easily said than done. Chip removal required The Sketchy Chinese Heat Gun. Tux looks slightly horrified on the photo, and rightly so. The temperature control on this particular unit, acquired several years ago on eBay from a dubious supplier in the Far East, is non-existent. It has two settings—fire of 1000 suns and OFF. (If and when I have more working capital at my disposal, I’ll invest a few thousand dollars in a much more reliable Hakko heat gun from Japan.) To add insult to injury, my soldering skills are mediocre at best. This surgical procedure was considerably more complicated than the +5V power line fix:

1) Melt the old chip off. Easy enough. I somehow managed to prevent surface-mount components that I did not intend to desolder from skittering off the board, never to be seen again.
2) Clean up the solder pads, apply solder flux, and place the replacement chip on the pads. Getting the two TXS0108s in the proper position literally drove me to drink, but I eventually succeeded.
3) Tack down opposite pins of the chip with the soldering iron, then flow a big blob of solder over the remaining pins. The pins were too close together for a mere mortal like me to solder them down one by one.
4) Remove the short circuits between pins with desoldering wick and a tool that looks like a dental instrument.
5) Remove the pullup resistors on the BeagleBeer board with desoldering tweezers.
6) Attempt to clean up the mess with solder flux remover.

tux_horrified

heat_gunafter_the_fix2
Although in principle this fix should have worked, it didn’t. Linux still acts blissfully ignorant of the presence of a temperature sensor. Doh!

The root cause of failure is still under investigation. I have a few more tricks up my sleeve:

1) Ask my co-worker at Analog Devices Lyric Labs, Vlad Kvartenko (a.k.a. master of electronics rework), to replace the TXB0108 chips on BeagleBeer serial number 2 with TXS0108s.
2) Bypass the TXS0108 on BeagleBeer serial number 1 and wire an alternative, the Adafruit Level Shifter module. between the RJ-45 connector and the BeagleBone ONE_WIRE_A line.

ID757_MED

The next challenge that must be overcome before the BeagleBeer plus Coaster system can be beta tested with actual beer in the Venture Café kegerator will be to sort out level translation for the flow sensors. Feel free to offer a ritual sacrifice to the Fickle Gods of Electronics Debugging on my behalf and keep an eye out for the next installment, Operation KEG Part 5: It’s Alive!

Random factoid: NASA astronaut Jack Swigert actually said: “Houston, we’ve had a problem here,” after the oxygen tank exploded on Apollo 13 on 13 April 1970.

The living part of beer

Yeasts are the living stars of the beer brewing process. Their work remained a secret for hundreds of years of brewing, but once brewers discovered their microorganism partners, they learned to use different yeasts’ characteristics to their advantage.

Yeasts are eukaryotic microorganisms, mostly unicellular, and vary largely in size from about 2 µm in diameter to 40 µm. They are classified in the kingdom Fungi, and have diversified to approximately 1500 different species. For the most part, yeasts reproduce asexually through mitosis, and often new yeasts may simply form as an outgrowth of existing yeast through “budding.”

The work that yeasts performed secretly for so long in the brewing process is called fermentation. It is the process by which they convert carbohydrates (sugars from the grains) to carbon dioxide and alcohols. Historically, brewers recognized that fermentation took place, but they did not understand the details of the underlying mechanism. Beer was exposed to the open air, which allowed natural yeast and bacteria to “infect” the beer, consuming the sugars and producing alcohols. One natural yeast is the Brettanomyces Lambicus strain, which produces sour beers descended from the lambic traditions of Belgian brewing.

Scientists in the 1800s began learning more about yeasts’ role in the environment in general as well as in brewing. In 1837, Theodore Schwann showed that yeast was alive, and by 1860, Louis Pasteur was able to connect yeasts to the fermentation process. He demonstrated that yeasts exposed to oxygen simply multiply, but when deprived of oxygen, cause a fermentation. Pasteur invented pasteurization to kill yeast, thus halting fermentation, which allowed more control over a number of food and drink production processes. Pasteurization was applied first to wine in 1864 at the request of Emperor Napoleon III to save his ailing wine industry, and about a decade later to beer (Pasteur authored his Etudes sur la Bière in 1876).

Later, brewers noted that the two main types of beer yeast are ale yeast (the “top-fermenting” type, Saccharomyces cerevisiae) and lager yeast (the “bottom-fermenting” type, Saccharomyces uvarum). The former operate at temperatures ranging from 10 to 25°C and rise to the surface during fermentation to create a thick yeast head. The latter work best at temperatures ranging from 7 to 15°C, and tend to settle at the bottom of the fermenter as their work progresses.

Today, brewers take advantage of yeast by-products in addition to alcohol, which impart much of the flavor and aroma on beer. Examples of these flavor compounds include acetaldehyde (green apple), esters (fruit), diacetyl (butterscotch), 2,3-pentanedione (honey), organic acids (sour or salty), fatty acids (soap), and dimethyl sulfide (cooked sweet corn). Brewers choose particular yeasts for their fermentation processes based on these byproducts, according to their desired aromatic and flavor profiles for the beers. For instance, German Hefeweizens often have distinct hints of banana courtesy of isoamyl acetate, the same ester found in abundance in one of the most popular fruits on Earth.

Next time you appreciate a good beer, take a moment to consider all the hard work accomplished by the yeasts, and imagine which ones were used to create the particular profile of the beer. They worked unappreciated for so long, so it’s up to us to celebrate their accomplishments – after all, they have supported networking and the creation of social connections for centuries.

An entryway to design, entrepreneurship, and beer

portico_logo

alex_rabe_venturecafe

Much like Venture Café, Portico Brewing Company sees itself as an accessible entryway into another world. For Portico, that world is craft beer. This Thursday, Alex Rabe, co-founder of Portico, will visit Venture Café to conduct guests through that delicious entryway.

portico_door

Named for one of the most ubiquitous architectural structures in the world, Portico Brewing Company focuses on the unassuming nature of its beer and markets its product to the everyday consumer who is considering a taste of craft beer. Like their logo, the Portico beer tap handles – one of which we will display this Thursday – reflect an emphasis on minimalism, featuring the brewers’ favorite pieces of architecture with a black and white design.

Portico arose from a love of entrepreneurship and beer. It was founded in the summer of 2012 by three Babson MBA graduates: Alex Zielke, Alex Rabe, and Ian Chester. The team spent over a year home brewing, incorporating Zielke’s skills as a certified Berlin Brewmaster, and hosting tastings with their friends. After several strategy sessions to figure out how three Babson MBAs should go about founding a brewery, they began to brew “gypsy style” at Watch City Brewing Company just down the road in Waltham, Massachusetts.

To date, Portico has produced four beers: a Belgian inspired Kolsch called Fuzzy Logic, a summer sour named Rendition, a fall Farmhouse Ale dubbed Saison Charrette, and a winter Scotch Ale christened Sett Seven. We will be serving Fuzzy Logic, Portico’s flagship beer, in the Café on Thursday. Kolsch is a traditional German beer from Cologne, Germany, but Portico’s version combines North American barley and wheat with German hops. This combination results in a balance of citrus and sweet malty flavors, with only a slightly bitter hop profile. The brewers use Belgian yeast, which makes Fuzzy Logic “Belgiany,” creating a fruit and floral aroma. The result is a smooth, refreshing beer, tasty to the everyday consumer or the craft beer aficionado.

This Thursday, walk through the portals of Venture Café to taste Fuzzy Logic, and to meet one of its makers. You might just learn about two Venture Café favorites: entrepreneurship and craft beer.

Keg Coupler Madness!

Robin and Shahin, still basking in the glory of our Eurobeer experiment with the S-system keg coupler, opted to forge ahead with our beer diversification initiative for Venture Café. Our crash course in keg coupler technology has taught us much about the inner workings of beer dispensing systems, knowledge that we feel obligated to share with our fellow beer aficionados. First and foremost, all keg couplers are not created equal.

keg_couplers

First unveiled in Operation Keg: Part 1, this project has encountered only one minor hiccup to date. Deceived by an incorrect photo on a vendor website, we mistakenly ordered plug connectors for the beer lines with retractable white plastic stoppers (top photo) that restricted flow more than we might have liked.

MCD2203

non-valved

Last Thursday during the Café, we replaced the errant connectors on the S- and D-system couplers with unvalved plug connectors (bottom photo). Problem solved!

During lunch hour on Friday, following the fortuitous arrival of two additional 5/16” plug connectors for the gas lines, we outfitted our brand-new G-system and A-system couplers with their very own quick-release valves, allowing them to join the august company of the previously retrofitted D- and S-system couplers. (Micromatic, the fine purveyor of the Venture Café’s keg couplers, maintains a reasonably comprehensive list of beer brands with corresponding keg taps.)

vc_coupler_collection_1

The A-coupler, aptly nicknamed the “German Slider,” engages the beer line by sliding sideways onto the keg. German breweries Warsteiner, Hacker-Pschorr, Paulaner, and Spaten, among others, distribute their wares A-compatible kegs. Well-known brews from the UK such as Boddingtons, Fuller’s, and Tennent’s use the G-system, as well as the Dutch brand Grolsch. Anchor Brewing Company in San Francisco made a name for itself in the 1980s as a contrarian by adopting the G-system instead of the D-coupler used by the vast majority of American beermakers. In recent years, Anchor has caved to peer pressure somewhat. Although they still distribute ½ and full barrel kegs with G-system connections, 1/6 kegs of Anchor beer are D-coupler compatible.

vc_coupler_collection_2

As shown in the photo above (along with Shahin’s hand), the G-coupler, named after the UK manufacturer Grundy, has an O-ring configuration similar to that on the German Slider, but the beer line is engaged by twisting onto the fitting at the top of the keg. At first glance, the beer inlets of the D- and S-couplers also look quite similar. However, because the probe on the S-coupler is longer and narrower than its counterpart on the D-coupler, they cannot be substituted for one another. D- and S-couplers are sometimes referred to as American and European Sankey couplers, respectively.
Who exactly was this Sankey character? An inquiring mind wanted to know. Naturally, I turned to that formidable fount of fantastic factoids otherwise known as Google. As it happens, Sankey refers to GKN Sankey Ltd. (now GKN plc). GKN (formerly Guest, Keen and Nettlefolds), a multinational producer of components for the automotive and aerospace industries headquartered in Worcestershire, England, has a storied history. The company evolved from an ironworks founded in 1759 during the early stages of the Industrial Revolution. The Sankey in question was Joseph Sankey (1826-1886), a producer of steel tea trays whose company, Joseph Sankey and Sons Ltd., began manufacturing auto bodies and steel wheels in the early 20th century. Sankey & Sons was acquired by GKN in 1920. The combined entity continued to diversify, entering the airplane engine turbine blade market in the 1950s. In January 1977, the U.S. Patent and Trademark Office issued Patent #4,002,273, entitled “Dispense Head for Liquid Containers” to Cyril Golding and Eugene Leonowicz, assigned to GKN Sankey Ltd. of Telford, England. Figure 1 looks familiar:

sankey_patent_fig1

Unfortunately, the Sankey brewery products business did not survive the manufacturing downturn in the UK during the 1980s, but the Sankey name (often misspelled as “Sanke” on beer websites) lives on.
Reading through the Sankey patent confirmed that all of the various and sundry keg couplers designs serve a common purpose– dispensing sanitary, good-tasting beer with just the right amount of carbonation. Modern beer kegs are equipped with a spear, a long metal tube that extends inside the keg down the middle from the ball valve at the top of the vessel, terminating at an open inlet near the bottom. The spear facilitates the uniform dispensing of beer at all liquid levels.

keg-spearmicromatic_d-coupler

Pulling the handle down and pushing it into the groove in the side of the coupler opens the CO2 valve. When connected to a gas canister but not to a keg, seating the handle causes CO2 to rush out around the rubber O-ring at the bottom of the device. The act of mating the coupler to the keg by twisting clockwise (or sliding in the case of the A-coupler) pushes down on the ball valve at the top of the spear. Beer flows upwards through the top of the coupler to the tap.

The engaged coupler forms a seal such that CO2 from the gas line cannot enter directly into the beer line. The gas, typically pressurized at 12-14 PSI, increases the pressure inside the keg, forcing beer up the spear and out the top of the coupler towards to the tap. As the keg empties, the CO2 forced into the keg through the gas line on the side of the coupler occupies the resulting empty space in the keg. Every couple of weeks, the CO2 tank in our kegerator runs out of gas and requires replacement. Although some of the CO2 dispensed from the gas canister in the kegerator ends up dissolving in the beer, CO2 also occurs naturally in beer as a byproduct of the fermentation process. Thus, the head of foam at the top of a glass of freshly-poured beer has both natural and artificial components.

TubKegPump

You may (or may not) recall that kegs of mass-produced American swill in frat house bathrooms have keg taps equipped with hand pumps. These decidedly low-brow beer dispensing systems introduce air into the keg, contaminating the beer and accelerating spoilage. Quality counts at Venture Café! Our craft beer selections remain unsullied by the surrounding environment until Amy, Greg, or Robin artfully pour them into squeaky clean, compostable Vegware cups. Stop by this Thursday from 3-8 pm to enjoy a cold beer, brought to you by Venture Café’s impressive collection of keg couplers.

Home brewing: a photographic journey

What could be a better St. Patrick’s weekend activity than brewing beer? I experienced my first taste of home brewing on Saturday, courtesy of my friend Tom, who acquired the relevant equipment and ingredients. The goal for the day was to make the recipe for a pale ale featuring citra hops. The first step was to mash malt that had already been run through a roller mill and crushed. The process of mashing combines the cracked grain with hot water, allowing enzymes to convert the starch in the malt into sugars. It’s like steeping tea.

photo-1-001

Next, we added both liquid and dry malt extract. Some brewers favor an “all-grain” approach to brewing, wherein they essentially make their own extract and are able to exert more control over the brewing process. For beginners, however, buying ready-made extract is a nice shortcut because it saves time and requires less equipment.

photo-2-001

The next step was to add the hops – both Nugget bittering hops and Citra flavoring hops. This phase of brewing requires occasional stirring with timed periods of heating at set temperatures between adding ingredients. We also added Irish Moss to prevent the beer from becoming cloudy.

photo-4-001
photo-3

Finally, it was time to take our concoction off the stove to cool it. The mixture has to be cooled to under 80 degrees so as not to kill the yeast when it is added. The cooling technique was quite low-tech: we gave the whole pot a cold bath.

photo-5

Once our brew was sufficiently cool, we poured it into a sanitized container and added water up to the 5 gallon mark.

photo-6
photo-7

Tom took the initial gravity reading for the beer. Gravity refers to the density of the wort, which is largely dependent on its sugar content. Tom will double check the gravity of the beer before declaring the fermentation process complete, because a high reading could indicate that the yeast organisms have not yet finished their job – and the resulting beer will be too sweet.

photo-8

After funneling the brew into its final (sanitized) storage container, Tom pitched the yeast.

photo-9
photo-10

The end result of my very first home brewing experience:

photo-11

The tube and water bath serve as a low-tech but sanitary way of allowing release of carbon dioxide produced from the fermentation process, but preventing other gases or potential contaminants from entering the storage container. I was informed this morning that the yeast were happily eating and reproducing, as evidenced by bubbles in the water bath.

Hopefully, in about a week and a half, Tom and I will bottle a delicious beer.

What do ESB, APA, XPA, EPA, IPA and DIPA have in common?

We get frequent questions at the Venture Café bar about different beer styles, and because we serve a lot of ales, many inquiries revolve around distinguishing pale ales, American Pale Ales, Extra Pale Ales, and India Pale Ales. As more craft breweries develop their own versions of these styles, the boundaries between them become less defined and the labels less meaningful. However, I can provide a brief pale ale primer for what you might expect when you order one of these beers.

The pale ale is a style of beer made through warm fermentation processes with top-fermenting yeast and predominantly pale malts. (These characteristics differentiate it from lagers, which are cold-stored and incorporate bottom-fermenting yeasts.) The malts are the source of the light color.

The granddaddy of pale ales are the British bitters – Best Bitters, Special Bitters, and Extra Special Bitters (ESBs), which are distinguished by strength. These beers are usually amber in color and dry, with hop bitterness dominating the flavor profile. Goose Island Honker’s Ale and Young’s Bitter are both examples of this style.

American Pale Ales (APAs) derive from the Bitters. They too are amber in color but can also range to more golden palates. Compared to their English counterparts, they tend to be cleaner and have less body, with less of a caramel malt profile and a more hoppy finish. Most of the flavor comes from American hops, including Amarillo, Cascade, Centennial, Chinook, and Simcoe. Unlike Belgian beers, flavors from the yeast (esters and phenols that lend fruity or spicy notes to a beer) are weak and dominated by the hops. The alcohol content ranges from about 4.5-6%. Sierra Nevada Pale Ale is the quintessential example of this style.

Extra Pale Ales (EPA or XPA) are usually categorized under American Pale Ales. They tend to be lighter in taste and alcohol content than regular pale ales, but there are no hard and fast rules for the label. Both High and Mighty XPA and Berkshire Brewing Company Steel Rail Extra Pale Ale do indeed fall on the lighter side of the APA spectrum.

India Pale Ales (IPAs) represent a hoppy solution to keep British soldiers stationed in India happy. To prevent beer shipped to India from spoiling, 19th century English beermakers increased the hopping rate and the alcohol content. English IPAs are brewed with English hops and tend toward woodsy, earthy, and spicy flavors. Try Left Hand’s 400 lb Monkey or Brooklyn’s East India Pale Ale to get a taste for the English IPA. In comparison, American IPAs have more alcohol and are more aggressively hopped, so you can expect to experience a well-rounded hop aroma and a more bitter flavor. Some American IPAs incorporate resinous pine and bitter grapefruit flavors, but many feature an overwhelming flowery hoppiness. Compare Dogfish Head’s 60 Minute IPA or Mayflower IPA to the English style IPAs above.

Finally, Double IPAs (DIPAs) or Imperial IPAs are an American invention that goes to extremes. These beers usually use double or even triple the typical amount of hops in an IPA recipe, but also add more malts to balance the flavors. The result is often a deeper, more complex brew featuring hoppy notes alongside a well-rounded malt profile and a high ABV. I find these beers to be sweeter than the typical IPA as well. Harpoon Leviathan and Blue Hills Imperial Red IPA provide local examples of this style.

These short descriptions should arm you with some rules of thumb the next time the pressure is on to select a beer. But remember, at Venture Café, we are always happy to guide your choice, and you can rarely go wrong.

Eurobeer!

At Venture Café this past Thursday (7 March 2013), Robin and Shahin performed a wildly successful full-scale test of our new S-type keg coupler. Check out Operation KEG Part 1 for a blow-by-blow of the behind-the-scenes engineering. The first Eurobeer on tap at Venture Café: Leffe Belgian Blonde Ale. We dispensed an entire 30L pony keg in less than 90 minutes!

We captured the ceremonial tapping of the keg on video:
[vimeo http://vimeo.com/61346844]

Operation KEG Part 3: Bespoke Kegbot

FormalKegbot

The Venture Café Kegerator Enhancement Group (VC-KEG) has been hard at work fulfilling its lofty mission to transform our kegerator into a technological marvel. As outlined in Operation KEG Part 2: Kegbot 101 the Kegbot open source beer kegerator control system has many virtues—most notably, the ability to measure keg temperature and beer consumption and to authenticate drinkers. Never satisfied to rest on his laurels though, Mr. Kegbot decided to take a trip to Savile Row and get himself a custom-made suit, hence the title of this post. Only the best for Venture Café! [Given that I have the artistic ability of a gnat, I commissioned my friend Ashley Short to render his new look in Photoshop.]

Why bother with the formal wear? For aesthetic reasons, of course. It’s perfectly understandable why the specifications for the Kegbot electronics call for old-school LEDs, resistors, capacitors, temperature sensors, and transistors with long wire leads. This choice of form factor makes self-assembly by hobbyists far easier. However, I just couldn’t get over the shocking resemblance of the Kegbot printed circuit boards (PCBs) to my 8th grade science project. I opted to redesign the PCBs with surface mount components, ensuring end products with sleeker, more sophisticated lines.

kegbot_controller

In a standard Kegbot build, an Arduino Uno acts as the primary controller. Arduino has done a great service to the world by bringing embedded computing to the masses. Arduinos are, for instance, immensely popular with hipsters creating ironic conceptual art installations that involve blinking LEDs. However, an Atmel Atmega328 8-bit microcontroller clocked at 16 MHz with no operating system has its limitations, prematurely thwarting VC-KEG’s Machiavellian scheme to rule the universe (of kegerators).

I considered two replacement options for the Arduino, both equipped with 32-bit ARM processors, the Raspberry Pi and the BeagleBone. Exhaustive feature comparisons live elsewhere on the Internet. The Raspberry Pi and required accessories retail for about ⅔ price of the $89 BeagleBone. The CPUs on both boards are clocked at upwards of 700 MHz, but the BeagleBone’s Texas Instruments AM335x ARM Cortex-A8 processor seriously outguns the Broadcom BCM2835 ARM11 on the Raspberry Pi.

BB-BONE-000beagle-hd-logo

Macho man microprocessor comparisons aside, the 65 externally accessible GPIO (General Purpose Input/Output) pins on the BeagleBone, make the Dog (woof!) the clear winner for the Venture Café Kegbot. The Raspberry Pi has a mere 8 GPIO pins, not enough to meet Kegbot requirements. (Ironically, Texas Instruments is one of my employer’s biggest competitors. But Analog Devices has no skin in this particular game, so as Robin Coxe, Venture Café bartender, I chose TI.)

The GPIO header connectors running along the edges of the BeagleBone enable the Kegbot Controller board to readily interface with the CPU. Mezzanine cards that mate with the BeagleBone to provide supplementary functionality such as the Kegbot Controller are called capes, in homage to the cape-wearing superhero beagle Underdog. Kegbot Controller inputs include temperature and flow readings from the Kegbot Coaster boards inside the kegerator. The processor can, in turn, activate relays, switch the LEDs on and off, and activate the buzzer over output lines. The BeagleBone sources 5V and 3.3 V DC power to the Controller board over the header connectors. Because the end result of my redesign of the Kegbot Controller to make it BeagleBone-compatible makes the entire get-up look like a flying squirrel, the Venture Café Kegboat Controller board shall henceforth be referred to as the BeagleBeer Flying Squirrel Controller.

As a self-respecting, card-carrying member of the Open Source Hardware Association, I forked the kegboard repository and uploaded the Venture Café Kegbot PCB design files and the Bill of Materials (BOM) to Github. I ordered the components on the BOM from Digikey, the mail-order electronics superstore in Thief River Falls, MN [of all places], and Sparkfun Electronics in Boulder, CO. [For those interested in building a standard Kegbot from scratch, click here and here for comprehensive parts lists.] I used Cadsoft Eagle PCB design software, originally developed in Germany, which has become the de facto standard for open source hardware designs. The arcane details of PCB design would probably bore most of you silly, but for those interested in learning more, the helpful engineers at Sparkfun have put together an excellent set of web tutorials on schematic capture, PCB layout , and parts creation using Eagle. The final PCB layouts of the Kegbot Coaster board and the BeagleBeer Flying Squirrel as rendered in the Eagle PCB layout tool:

VC_kegbot_coaster_layout

beaglebeer_controller

I plan to retrieve the hand-assembled PCBs from the contract manufacturer, Proxy Manufacturing in Methuen, MA, by the end of the week. Just like our beer, Venture Café electronics are locally sourced and artisanal. (“Wicked awesome!” as we Massholes liked to say back in the ‘80s.) The PCBs were fabricated in the Oregon, so the bespoke Venture Café Kegbot electronics can wear the “Made in the USA” label with pride. As soon as I have fully populated boards in hand, I’ll port the Kegbot controller code (written in C++) from the Arduino to the BeagleBone, a process that, like most things in life, is easier said than done. Fasten your seatbelts! In Operation KEG Part 4, I’ll document the fascinating saga of commissioning the Kegboard Coaster and the BeagleBeer Controller electronics.

coaster_pcbbeaglebeer_pcb